
The Joy of Making Phyllo from Scratch

Homemade Phyllo Dough: A Simple Delight
Who doesn’t love the delicate, flaky layers of phyllo dough? Whether it’s baklava, spanakopita, or a savory pie, the allure of dishes made with phyllo is undeniable. However, if you’ve only ever used store-bought phyllo, you’re in for a treat. Homemade phyllo dough is not only superior in taste and texture, but it’s also surprisingly easy and forgiving to make. Yes, you heard that right—making phyllo dough at home is manageable, and I’m here to guide you through it. By the end of this, you might never want to go back to the pre-packaged option.

Understanding Phyllo Dough
Phyllo, or filo, means “leaf” in Greek, referring to the paper-thin layers that make up the dough. It’s a staple in Middle Eastern and Balkan cuisines, known for its use in pastries like baklava and savory pies like spanakopita. The key to perfect phyllo is achieving those whisper-thin layers that become irresistibly crisp and flaky when baked.
The Role of Ingredients
- Bread Flour: The higher protein content in bread flour helps develop gluten, giving the dough elasticity and strength, which is crucial for stretching it thin without tearing.
- Olive Oil: Adds moisture and richness to the dough, also aiding in elasticity.
- White Wine Vinegar: The acidity in vinegar helps tenderize the dough, making it more pliable and easier to roll out thin. It also contributes to the final texture of the baked phyllo.
- Honey: Adds a slight sweetness and helps in browning and crisping the dough.
- Salt: Enhances the flavor of the dough and also strengthens the gluten structure.
- Water: Hydrates the flour, activating the gluten. The temperature of the water can affect the dough’s texture; lukewarm water is typically used to encourage gluten development.
- Semolina Flour: Semolina, made from durum wheat, is key for the rolling process of phyllo dough. Its slightly coarser texture compared to regular flour provides a non-stick surface that’s ideal for rolling out the dough without adding too much moisture. It helps in achieving the thin, transparent layers characteristic of phyllo by preventing the dough from sticking to the rolling pin or the work surface. When used for dusting, semolina also contributes to the final texture of phyllo, giving it a slight crunch and preventing the layers from sticking to each other. Integrating semolina flour into the phyllo dough process not only facilitates the rolling out of ultra-thin layers but also enhances the final baked product’s texture. Its unique properties make it an invaluable ingredient for achieving the delicate balance required for perfect homemade phyllo dough.

The Joy of Making Phyllo from Scratch
Store-bought phyllo dough has its place in our kitchens due to its convenience. But once you experience the difference that homemade phyllo brings to your dishes, it’s hard to settle for anything less. The texture and flavor of freshly made phyllo dough enhance your recipes in a way that store-bought simply cannot match. Plus, the process of making it is not as daunting as you might think. It’s actually quite a rewarding experience, one that connects you more deeply with the food you prepare and enjoy.
Ingredients You’ll Need
Making phyllo dough requires just a few basic ingredients, which you might already have in your pantry:
- 4 cups of bread flour
- 2 tsp of olive oil
- 5 tsp of white wine vinegar
- 1 tbsp of honey
- 1 tsp of salt
- 1 cup of water
- Semolina or all-purpose flour, for rolling out the dough
Step-by-Step Guide to Homemade Phyllo
- Prepare Your Dough: Begin by combining the bread flour, olive oil, honey, vinegar, and salt in a stand mixer fitted with a dough hook. Add the water and mix for about 5 minutes. If you don’t have a mixer, don’t worry—you can also mix the ingredients by hand and knead the dough for about 10 minutes. You’re looking for the dough to be soft and elastic, pulling away from the sides of the bowl but still tacky, not sticky.
- Resting Time: Once your dough reaches the right consistency, transfer it to another bowl, cover it, and let it rest for about 45 minutes. This rest period is crucial for the dough to develop the right texture.
- Divide and Conquer: After resting, divide the dough into eight equal parts. Work with one portion at a time, flattening it into a round shape with your hands.
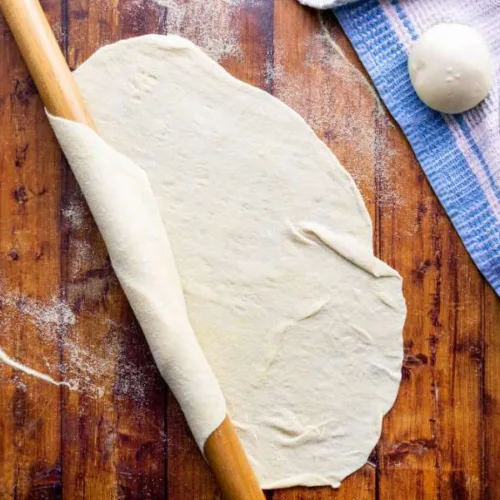
- Roll It Out: Lightly flour your working surface with either semolina or all-purpose flour. Place your flattened dough on the surface and start rolling it out with a long rolling pin. Turn the dough 90 degrees frequently, flipping and flouring each time to prevent sticking. Aim to keep the dough round and roll it out until it’s thin enough that you can almost see through it.
- Embrace Imperfections: It’s okay if the dough tears a bit; remember, phyllo dough is very forgiving. Since you’ll be layering it, small imperfections won’t affect the final taste or presentation of your dish.

Tips for Perfect Phyllo Every Time
- Water Adjustment: The amount of water needed can vary based on the flour used and the humidity in your environment. Start with 1 cup of water, but if the dough feels too crumbly, add a little more water, one tablespoon at a time, until it comes together.
- Patience Is Key: Don’t rush the process, especially when rolling out the dough. Thin, delicate layers are the hallmark of a good phyllo, and achieving them requires patience and gentle handling.
- Enjoy the Process: Making phyllo dough is not just about the end product. It’s about enjoying the process of creating something from scratch, understanding the feel of the dough, and taking pride in your culinary creations.
Techniques for Success
- Kneading: Whether using a stand mixer or your hands, kneading develops the gluten in the dough, which is essential for elasticity. However, over-kneading can make the dough tough, so once it reaches the desired consistency (soft, elastic, and pulling away from the bowl), it’s time to stop.
- Resting: The resting period allows the gluten in the dough to relax, making it easier to roll out thinly without springing back. Don’t skimp on this step; patience here pays off in the quality of your phyllo.
- Rolling: This is the most critical step in achieving those trademark thin layers. A long, thin rolling pin works best. Applying even pressure and frequently turning and flipping the dough helps maintain a circular shape and ensures uniform thinness. Dusting with flour prevents sticking without adding too much additional flour to the dough.
- Layering: When using your homemade phyllo in recipes, layering correctly is key. Brushing each layer with melted butter or oil not only helps the layers stick together but also contributes to the flaky texture as the dough bakes.
Troubleshooting Common Issues
- Tearing: If your phyllo tears while rolling, don’t worry. Phyllo dough is forgiving, especially since most recipes require multiple layers. Just patch it up and keep going.
- Sticking: If the dough sticks to your rolling pin or work surface, it likely needs more flour. However, use a light hand to avoid making the dough tough.
- Dryness: If the dough starts to dry out while you’re working with it, cover the pieces you’re not currently using with a damp cloth. This keeps the dough pliable.
Final Thoughts
Homemade phyllo dough might seem like a culinary challenge reserved for the skilled baker, but it’s genuinely an approachable project for cooks of all levels. With a little patience and practice, you’ll be turning out dishes with phyllo that is incomparably flaky, tender, and delicious. Whether you’re making a sweet dessert or a savory meal, the extra effort of homemade phyllo will elevate your cooking, delighting your taste buds and impressing your guests. So, why not give it a try? The results might just surprise you.
Basic Homemade Phyllo Dough
Equipment
- 4 Cups (500g)
Ingredients
- 500 g Bread flour (or 4 cups)
- 10 ml Olive oil (or 2 tsp)
- 25 ml White wine vinegar (or 5 tsp)
- 15 ml Honey (or 1 Tbsp)
- 5 g Salt (or 1 tsp)
- 250 ml Water (or 1 cup) adjust as needed
- Semolina flour or all-purpose flour, for rolling out the dough
Instructions
- In the bowl of a stand mixer fitted with the dough hook attachment, combine the bread flour, olive oil, white wine vinegar, honey, and salt. Start the mixer on a low speed and gradually add the water until the mixture comes together to form a dough. Adjust the water as needed, depending on the flour and environmental conditions. Once the dough has formed, increase the mixer speed to medium and knead for about 5 minutes until the dough is soft, elastic, and slightly tacky but not sticky.
- If you don’t have a stand mixer, combine the ingredients in a large bowl. Once mixed, transfer the dough to a floured surface and knead by hand for about 10 minutes until it reaches the desired consistency.
- Shape the dough into a ball and place it in a clean, lightly oiled bowl. Cover the bowl with a damp cloth or plastic wrap and let the dough rest for 45 minutes. This resting period allows the gluten to relax, making it easier to roll the dough out thinly later.
- After resting, turn the dough out onto a lightly floured surface. Divide it into 8 equal portions. Shape each portion into a small ball.
- Working with one ball at a time, press it down into a flat disk with your hands. Lightly flour your work surface and rolling pin with either semolina or all-purpose flour. Roll out the dough, turning and flipping it frequently, and adding more flour as needed to prevent sticking. Aim to get the dough as thin as possible, ideally so thin that you can see your hand or the countertop through it.
- Once rolled out, the phyllo sheets can be used immediately in your favorite recipes. If layering, brush each sheet lightly with melted butter or oil to prevent them from sticking together and to achieve that characteristic flaky texture when baked.
- Follow the baking instructions for your chosen recipe. Typically, phyllo dough bakes well at a high temperature (between 375°F to 400°F or 190°C to 200°C) until golden brown and crisp.
Notes
- Adjusting Water: The exact amount of water needed can vary. Start with the smaller amount and add more as necessary. The dough should be pliable and smooth but not sticky.
- Storage: If not using the phyllo dough immediately, stack the rolled-out sheets between layers of parchment paper, wrap well in plastic wrap, and refrigerate for a day or freeze for longer storage. Thaw overnight in the refrigerator before using.